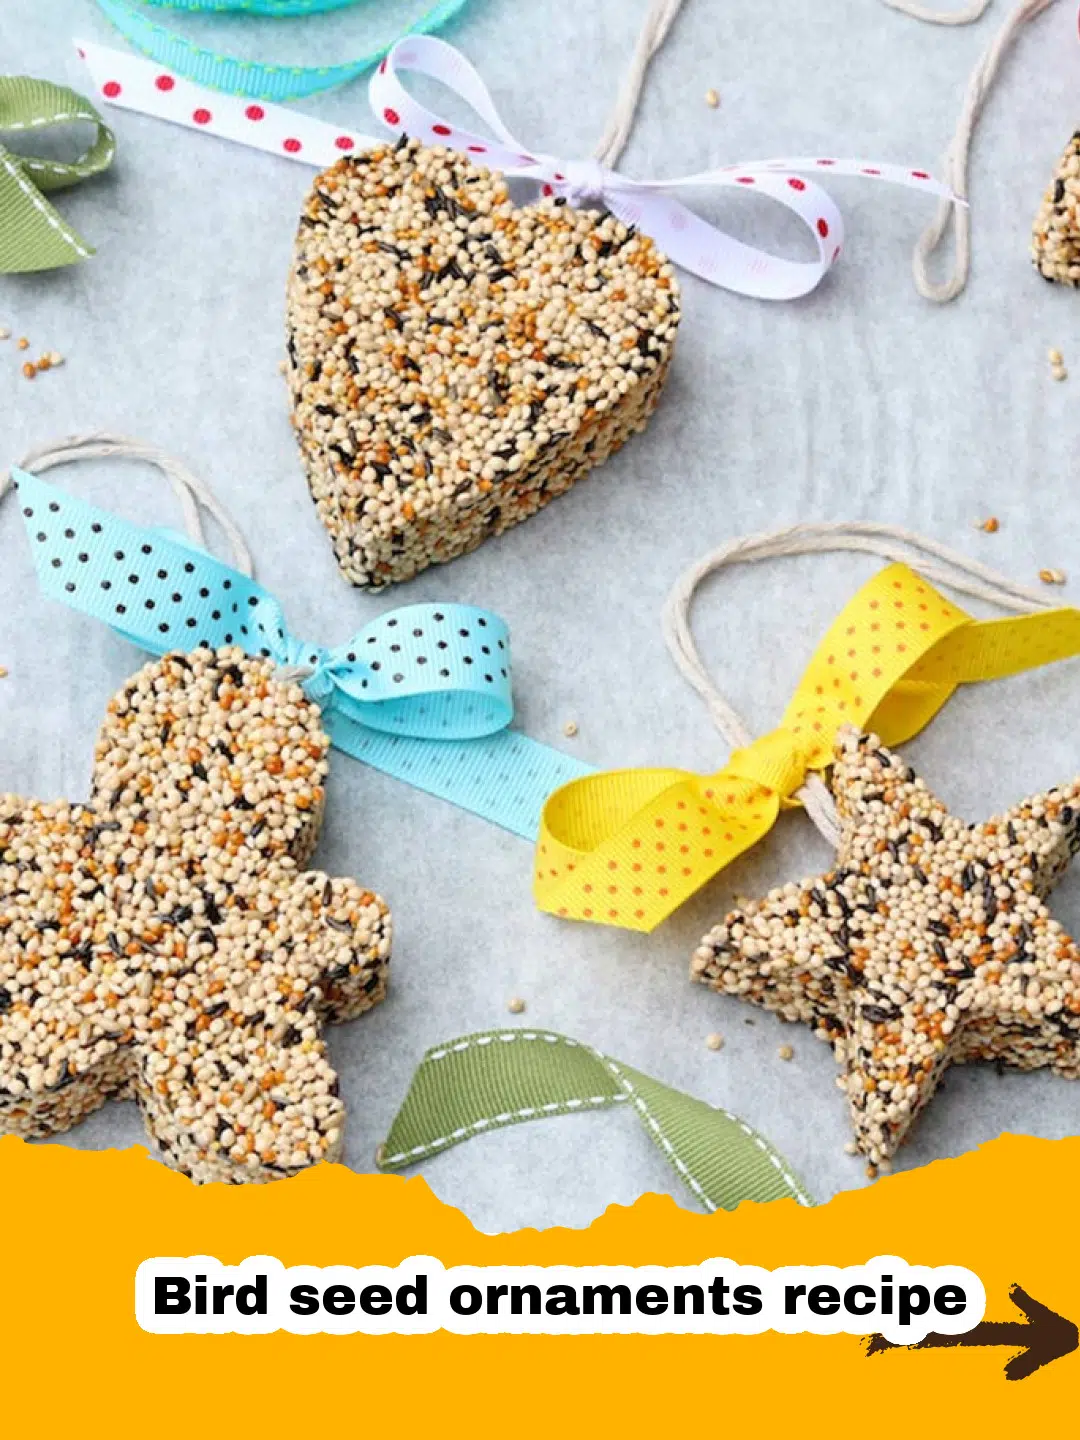
I remember winters in my grandmother's backyard, a magical place filled with snow-dusted evergreens and the cheerful chirping of birds. My grandma, a true nature lover, always worried about her feathered friends during the colder months, especially when natural food sources became scarce. One crisp afternoon, she introduced me to the wonderful world of making a bird seed ornaments recipe. It wasn't just about feeding the birds; it was a cherished tradition, a quiet afternoon spent together, mixing sticky ingredients, pressing them into cookie cutters, and threading twine. Hanging these homemade treats transformed her garden into a vibrant haven for cardinals, chickadees, and finches. These edible decorations brought such profound joy, knowing we were helping local wildlife, and they filled the grey winter days with natural beauty. It’s a craft that combines kindness with creativity, and I'm so excited to share this treasured bird seed ornaments recipe with you today, so you can create your own backyard magic.
Why This Bird Seed Ornaments Recipe is a Must-Try
Beyond the simple joy of crafting, this bird seed ornaments recipe offers numerous benefits, making it a perfect winter project. It's an experience that nourishes both nature and the soul.
- Simple & Rewarding: This bird seed ornaments recipe is incredibly easy, making it a perfect project for all ages. The joy of seeing birds flock to your handmade feeders is immensely rewarding.
- Eco-Friendly Decoration: These ornaments are entirely biodegradable and provide essential sustenance, making them a beautiful, responsible choice for outdoor decor.
- Educational for Kids: It’s a fantastic way to teach children about local wildlife, the importance of caring for nature, and bird feeding, all while having fun with a hands-on craft.
- Thoughtful Handmade Gift: These unique and functional ornaments make heartwarming gifts for nature lovers, teachers, or anyone who appreciates a homemade gesture.
Key Ingredient Notes for Your Bird Seed Ornaments Recipe
Understanding the role of a few key ingredients ensures success for your bird seed ornaments recipe and the safety of your feathered visitors.
- Unflavored Gelatin: The Binder: This is the crucial binding agent. Use unflavored gelatin, as sugar and artificial colors in flavored varieties are harmful to birds. Blooming it in cold water first, then dissolving in hot water, is key for strong binding power.
- Quality Bird Seed Mix: While any general mix works, a high-quality blend specific to your local birds is best. Black oil sunflower seeds, millet, and safflower are common and well-loved. Avoid mixes with too many fillers like red milo; a varied mix attracts more species.
- Light Corn Syrup (Optional): A small amount adds extra stickiness and helps with overall cohesion, improving durability and giving a slight sheen. It's safe for birds in the small quantity used and enhances the longevity of your bird seed ornaments recipe.
Step-by-Step Guide to Crafting Your Bird Seed Ornaments Recipe with Pro Tips
Follow these detailed steps to ensure your success, and soon your garden will be bustling with grateful feathered visitors. Patience in setting is key for this bird seed ornaments recipe!
- Step 1: Prepare your workstation. Lay out parchment paper on a baking sheet. Gather your cookie cutters, twine, and a drinking straw. Having everything ready ensures a smooth crafting process for your bird seed ornaments recipe.
- Step 2: Bloom the gelatin. In a large bowl, pour 1/2 cup cold water. Sprinkle 2 packets of unflavored gelatin evenly over it. Let sit for 5 minutes to bloom and thicken. This is crucial for its binding power.
- Step 3: Dissolve the gelatin. Carefully pour 1/2 cup boiling water over the bloomed gelatin. Stir continuously until the gelatin is completely dissolved and the mixture is clear. No granules should remain.
- Step 4: Add corn syrup (optional). If using for extra durability, stir in 2 tablespoons of light corn syrup until fully incorporated. This enhances the bond of your bird seed ornaments recipe.
- Step 5: Mix in the bird seed. Gradually add 4 cups of mixed bird seed to the gelatin mixture. Stir thoroughly with a sturdy spoon, ensuring all seeds are completely coated with the sticky mixture.
- Step 6: Form the ornaments. Place cookie cutters on the parchment-lined sheet. Spoon bird seed mixture into each, pressing down very firmly and evenly with a spoon or your fingers to ensure density.
- Step 7: Create hanging holes. While mixture is in the cutter, use a drinking straw or skewer to create a hole near the top of each ornament. Make sure it's wide enough for twine.
- Step 8: Chill and set. Carefully remove cookie cutters. Place baking sheet in the refrigerator for 2-4 hours, or until ornaments are firm. For best results, air dry overnight after chilling.
- Step 9: Add twine for hanging. Once completely dry and firm, thread an 8-10 inch piece of twine or ribbon through the hole. Tie ends together to form a loop. Your beautiful bird seed ornaments recipe creations are now ready!
- Step 10: Store properly. If not hanging immediately, store finished ornaments in an airtight container in a cool, dry place away from humidity. They can last weeks. Basics Glass Food Storage containers work perfectly for this.
Creative Variations & Thoughtful 'Serving' Suggestions
This bird seed ornaments recipe is wonderfully adaptable! Customize your creations to make them even more special for both birds and your garden aesthetic.
- Shape Shifters: Experiment with various cookie cutter shapes like stars, bells, or tiny bird figures. For extra texture, press small pinecones or dried berries onto the back before setting.
- Ribbon & Twine Alternatives: Use natural jute, raffia, or braided grasses for hanging. A festive, weatherproof bow of natural fabric ribbon can add a decorative touch once dry.
- Nutty Nests: Attract specific birds like woodpeckers by mixing finely chopped unsalted peanuts or walnuts into a portion of your bird seed. High-energy fats are very appealing!
- Fruity Fun: Add finely chopped dried cranberries or raisins (unsweetened, sulfur-dioxide-free) to your mixture for a sweet and nutritious boost, appealing to ground-feeding birds.
- Thoughtful Gifting: Package dried ornaments in tissue paper or a decorative box with a tag detailing ingredients and hanging instructions. This makes your bird seed ornaments recipe a charming, personal gift. For an extra layer of winter crafting joy, you might also enjoy making a DIY Cinnamon Ornament Recipe – another wonderful way to add scent and beauty to your home.
Nutrition Information (Estimated per Ornament)
While these are for our feathered friends, here's an estimated nutritional breakdown for those curious about what a single bird seed ornament might contain (based on average bird seed mix and gelatin):
| Nutrient | Amount |
|---|---|
| Calories | 150 kcal |
| Carbohydrates | 15g |
| Cholesterol | 0mg |
| Fat Content | 10g |
| Fiber Content | 4g |
| Protein Content | 5g |
| Saturated Fat | 1g |
| Serving Size | 1 ornament |
| Sodium Content | 10mg |
| Sugar Content | 0g |
| Trans Fat | 0g |
| Unsaturated Fat | 8g |
Conclusion
Making a bird seed ornaments recipe is so much more than just a craft; it's a profound act of kindness, a tangible connection to the natural world, and a wonderfully creative way to brighten up your outdoor space during the colder months. It’s a simple project that yields immense satisfaction, bringing joy to you and your family, and essential sustenance to your local feathered neighbors when they need it most. I hope this guide has inspired you to embark on your own journey of creating these beautiful and beneficial bird feeders. It's a delightful activity that can easily become a cherished annual tradition. Happy crafting, and enjoy the magical sight of your garden coming alive with chirping friends! If you've enjoyed this nature-friendly craft, you might also love exploring other easy DIY decoration projects, such as our guide to Classic Salt Dough Ornaments, perfect for crafting lasting memories.
FAQs
How long do bird seed ornaments last?
Bird seed ornaments typically last several weeks outdoors, depending on local weather conditions (rain, humidity) and how quickly birds consume them. When stored properly in an airtight container in a cool, dry place, they can last for a few months before use.
Are these bird seed ornaments safe for all birds?
Yes, this bird seed ornaments recipe uses unflavored gelatin and natural bird seed, which are safe for most common backyard birds. It's crucial to always avoid ingredients like artificial colors, added sugars, or salted nuts, as these can be harmful to bird health.
Can I use other binders instead of gelatin for a bird seed ornaments recipe?
While gelatin is the most common and effective binder for structural integrity, some recipes explore alternatives like unsalted, natural peanut butter or suet. However, gelatin generally provides the best firm structure for hanging ornaments, especially in varying temperatures.
Why are my bird seed ornaments falling apart?
Common reasons include insufficient gelatin, incomplete dissolution of gelatin, or not pressing the mixture firmly enough into the molds. Most importantly, ensure ample time for the ornaments to fully dry and set (at least 2-4 hours chilling, ideally overnight air drying) before handling or hanging. Moisture is the biggest enemy of their structure!
Homemade Bird Seed Ornaments
- Total Time: 2-4 hours (drying/setting time)
- Yield: 10-12 medium ornaments 1x
Description
A simple and heartwarming recipe for crafting edible bird feeders using bird seed and gelatin, perfect for attracting feathered friends to your garden during the colder months.
Ingredients
1/2 cup boiling water
1/2 cup cold water
2 (0.25 oz) packets unflavored gelatin
2 tablespoons light corn syrup (optional, but recommended for durability)
4 cups mixed bird seed
Twine or ribbon for hanging
Cookie cutters
Drinking straw or skewer
Parchment paper
Baking sheet
Instructions
Step 1: Prepare your workstation. Lay out parchment paper on a baking sheet. Gather your cookie cutters, twine, and a drinking straw or skewer. This bird seed ornaments recipe benefits from having everything ready.
Step 2: Bloom the gelatin. In a large mixing bowl, pour the 1/2 cup of cold water. Sprinkle the unflavored gelatin packets evenly over the cold water. Let it sit for 5 minutes, allowing the gelatin to bloom and absorb the water, becoming thick and gel-like. This is a crucial step for the binding power of your bird seed ornaments recipe.
Step 3: Dissolve the gelatin. Carefully pour the 1/2 cup of boiling water over the bloomed gelatin. Stir continuously until the gelatin is completely dissolved and no granules remain. This might take a minute or two. Ensure the mixture is clear before proceeding.
Step 4: Add corn syrup (optional). If using, stir in the 2 tablespoons of light corn syrup into the dissolved gelatin mixture. This helps create a stronger bond and gives your bird seed ornaments recipe a slightly more polished finish.
Step 5: Mix in the bird seed. Gradually add the 4 cups of mixed bird seed to the gelatin mixture, stirring well with a sturdy spoon or spatula. Ensure all the seeds are thoroughly coated with the gelatin mixture. You want a consistent, sticky blend where every seed is getting some of that binding power.
Step 6: Form the ornaments. Place your cookie cutters directly onto the parchment-lined baking sheet. Spoon the bird seed mixture into each cookie cutter, pressing it down firmly and evenly with the back of a spoon or your fingers. The firmer you press, the more solid your bird seed ornaments recipe will be.
Step 7: Create hanging holes. While the mixture is still in the cookie cutter, use a drinking straw or skewer to create a hole near the top of each ornament. Make sure the hole is large enough for your twine to pass through easily. If the hole starts to close, re-insert the straw to clear it.
Step 8: Chill and set. Carefully remove the cookie cutters from around the bird seed shapes. You may need to gently wiggle them. Place the baking sheet with the formed ornaments into the refrigerator for at least 2-4 hours, or until they are firm and solid. For best results, let them air dry at room temperature overnight after chilling.
Step 9: Add twine for hanging. Once completely dry and firm, thread a piece of twine or ribbon (about 8-10 inches long) through the hole you created in each ornament. Tie the ends together to form a loop for hanging. Your beautiful bird seed ornaments recipe creations are now ready to adorn your garden or give as gifts!
Step 10: Store properly. If you're not hanging them immediately, store your finished bird seed ornaments in an airtight container in a cool, dry place. They can last for several weeks if kept away from moisture.
Notes
For best results, ensure your ornaments are fully dried before hanging to prevent them from breaking apart prematurely. The more firm they are, the longer they will last outdoors and withstand weather conditions.
- Prep Time: 20 minutes
- Cook Time: 0 minutes (plus 2-4 hours chilling/drying)
- Category: Crafts, Outdoor Activities
- Cuisine: N/A
Nutrition
- Serving Size: 1 ornament
- Calories: 150 kcal
- Sugar: 0g
- Sodium: 10mg
- Fat: 10g
- Saturated Fat: 1g
- Unsaturated Fat: 8g
- Trans Fat: 0g
- Carbohydrates: 15g
- Fiber: 4g
- Protein: 5g
- Cholesterol: 0mg
Leave a Reply