Description
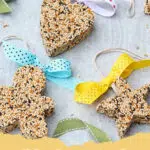
A simple and heartwarming recipe for crafting edible bird feeders using bird seed and gelatin, perfect for attracting feathered friends to your garden during the colder months.
Ingredients
1/2 cup boiling water
1/2 cup cold water
2 (0.25 oz) packets unflavored gelatin
2 tablespoons light corn syrup (optional, but recommended for durability)
4 cups mixed bird seed
Twine or ribbon for hanging
Cookie cutters
Drinking straw or skewer
Parchment paper
Baking sheet
Instructions
Step 1: Prepare your workstation. Lay out parchment paper on a baking sheet. Gather your cookie cutters, twine, and a drinking straw or skewer. This bird seed ornaments recipe benefits from having everything ready.
Step 2: Bloom the gelatin. In a large mixing bowl, pour the 1/2 cup of cold water. Sprinkle the unflavored gelatin packets evenly over the cold water. Let it sit for 5 minutes, allowing the gelatin to bloom and absorb the water, becoming thick and gel-like. This is a crucial step for the binding power of your bird seed ornaments recipe.
Step 3: Dissolve the gelatin. Carefully pour the 1/2 cup of boiling water over the bloomed gelatin. Stir continuously until the gelatin is completely dissolved and no granules remain. This might take a minute or two. Ensure the mixture is clear before proceeding.
Step 4: Add corn syrup (optional). If using, stir in the 2 tablespoons of light corn syrup into the dissolved gelatin mixture. This helps create a stronger bond and gives your bird seed ornaments recipe a slightly more polished finish.
Step 5: Mix in the bird seed. Gradually add the 4 cups of mixed bird seed to the gelatin mixture, stirring well with a sturdy spoon or spatula. Ensure all the seeds are thoroughly coated with the gelatin mixture. You want a consistent, sticky blend where every seed is getting some of that binding power.
Step 6: Form the ornaments. Place your cookie cutters directly onto the parchment-lined baking sheet. Spoon the bird seed mixture into each cookie cutter, pressing it down firmly and evenly with the back of a spoon or your fingers. The firmer you press, the more solid your bird seed ornaments recipe will be.
Step 7: Create hanging holes. While the mixture is still in the cookie cutter, use a drinking straw or skewer to create a hole near the top of each ornament. Make sure the hole is large enough for your twine to pass through easily. If the hole starts to close, re-insert the straw to clear it.
Step 8: Chill and set. Carefully remove the cookie cutters from around the bird seed shapes. You may need to gently wiggle them. Place the baking sheet with the formed ornaments into the refrigerator for at least 2-4 hours, or until they are firm and solid. For best results, let them air dry at room temperature overnight after chilling.
Step 9: Add twine for hanging. Once completely dry and firm, thread a piece of twine or ribbon (about 8-10 inches long) through the hole you created in each ornament. Tie the ends together to form a loop for hanging. Your beautiful bird seed ornaments recipe creations are now ready to adorn your garden or give as gifts!
Step 10: Store properly. If you're not hanging them immediately, store your finished bird seed ornaments in an airtight container in a cool, dry place. They can last for several weeks if kept away from moisture.
Notes
For best results, ensure your ornaments are fully dried before hanging to prevent them from breaking apart prematurely. The more firm they are, the longer they will last outdoors and withstand weather conditions.
- Prep Time: 20 minutes
- Cook Time: 0 minutes (plus 2-4 hours chilling/drying)
- Category: Crafts, Outdoor Activities
- Cuisine: N/A
Nutrition
- Serving Size: 1 ornament
- Calories: 150 kcal
- Sugar: 0g
- Sodium: 10mg
- Fat: 10g
- Saturated Fat: 1g
- Unsaturated Fat: 8g
- Trans Fat: 0g
- Carbohydrates: 15g
- Fiber: 4g
- Protein: 5g
- Cholesterol: 0mg