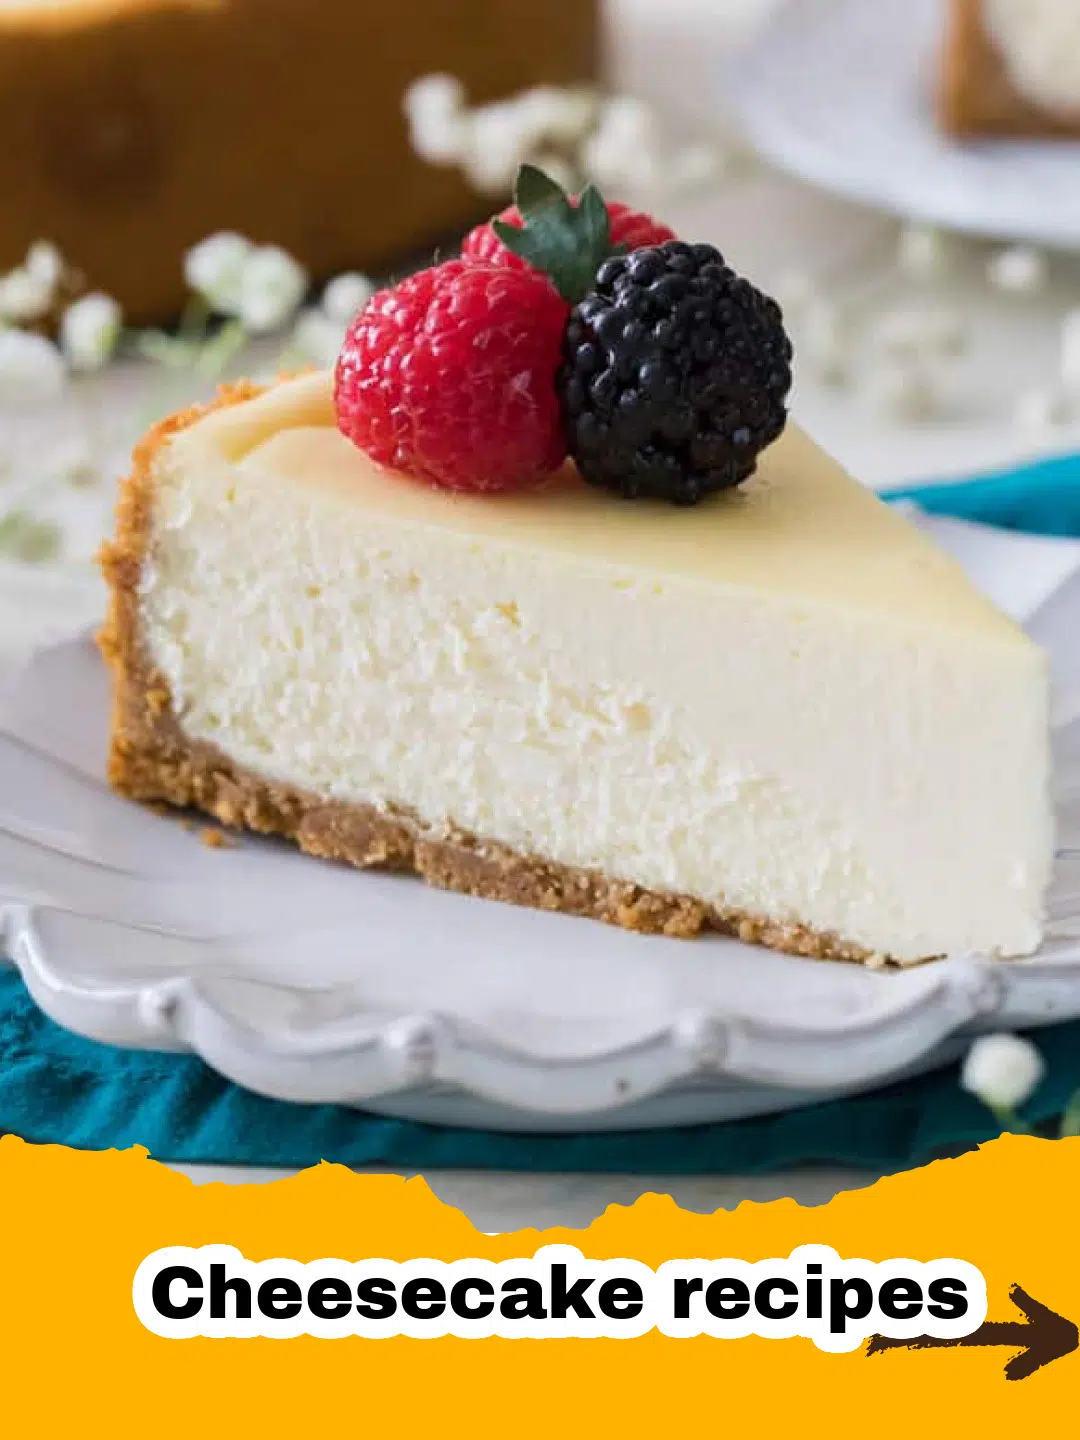
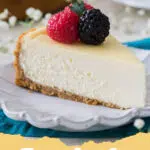
There's something truly magical about a perfectly baked cheesecake. I remember my grandmother, a woman whose kitchen always smelled of warmth and vanilla, attempting her first New York style cheesecake. It was for my grandfather’s birthday, and she had meticulously followed a recipe from an old cookbook. The first one cracked, the second one was a little too soft, but the third? The third was pure perfection. A creamy, dreamy slice of heaven that became a staple at every family gathering thereafter. It taught me that sometimes, the best recipes require a little patience and a lot of love. Over the years, I've refined my own approach to classic cheesecake recipes, drawing on her wisdom and countless delicious experiments. Today, I'm thrilled to share with you the culmination of those efforts: a recipe for a Classic New York Style Cheesecake that's guaranteed to impress and delight. Forget the fear of cracks or gummy textures; with my pro tips, you'll be baking like a seasoned pro in no time, ready to add this to your collection of cherished cheesecake recipes.
Why This Recipe is a Must-Try
- Unbelievably Creamy Texture: This recipe delivers that signature dense, rich, and velvety-smooth texture that New York style cheesecake is famous for. No dry or crumbly bites here!
- Perfectly Balanced Sweetness: Sweet enough to be a decadent treat, but with just the right amount of tang from the sour cream and cream cheese to keep it from being cloyingly sweet. It's a symphony for your taste buds.
- Foolproof Method for No Cracks: With specific instructions on water baths, gentle baking, and proper cooling, we tackle the dreaded cheesecake crack head-on, ensuring a beautiful, smooth top every time.
- Crowd-Pleaser & Make-Ahead Friendly: Cheesecake is always a showstopper, perfect for special occasions or simple indulgence. Plus, it can be made a day or two in advance, freeing up your time when you need it most. This makes it one of those indispensable cheesecake recipes for entertaining.
Key Ingredient Notes
The success of classic cheesecake recipes hinges on the quality and preparation of a few key ingredients. Don't skimp on these!
Full-Fat Cream Cheese
This is non-negotiable for a truly authentic New York style cheesecake. Always opt for full-fat cream cheese, preferably brick-style, not whipped or spreadable. The higher fat content contributes significantly to the cheesecake's characteristic richness, density, and creamy mouthfeel. Ensure your cream cheese is at room temperature before you begin mixing. Cold cream cheese will result in a lumpy batter, which can lead to an uneven texture in your final product. Take it out of the fridge at least 1-2 hours before you plan to start baking.
Sour Cream
Sour cream plays a crucial role beyond just adding a slight tang to balance the sweetness. It also contributes to the cheesecake's incredibly smooth and tender texture. Like the cream cheese, make sure your sour cream is at room temperature. This helps it emulsify properly with the other ingredients, preventing lumps and ensuring a consistently creamy batter. Some cheesecake recipes might use heavy cream, but for that classic New York tang, sour cream is essential.
Vanilla Extract
While it might seem like a small detail, the quality of your vanilla extract can make a big difference. Use a good quality pure vanilla extract, not imitation. Vanilla enhances all the other flavors in the cheesecake, adding depth and warmth. You can even experiment with vanilla bean paste for those tiny, beautiful flecks of vanilla, which truly elevate any of your favorite cheesecake recipes.
Graham Cracker Crumbs
The foundation of any great cheesecake is its crust. For this classic recipe, we’re using graham crackers. You can buy pre-crushed graham cracker crumbs, but I find that crushing your own whole graham crackers yields a fresher, more flavorful crust. Use a food processor for a fine, even crumb, or place them in a zip-top bag and crush them with a rolling pin for a more rustic texture. Don't forget a pinch of salt to balance the sweetness of the crust.
Step-by-Step Guide with Pro Tips
Mastering cheesecake recipes is all about technique. Follow these steps carefully for the best results!
Preparing the Crust
The crust is the base of our masterpiece. A good crust provides a delightful textural contrast to the creamy filling.
- Step 1: Preheat your oven to 350°F (175°C). In a medium bowl, combine 1 ½ cups graham cracker crumbs, ¼ cup granulated sugar, and ½ teaspoon ground cinnamon. Mix thoroughly.
- Step 2: Pour in 6 tablespoons of melted unsalted butter. Mix until the crumbs are evenly moistened and resemble wet sand.
- Step 3: Press the crumb mixture firmly into the bottom and about 1 inch up the sides of a 9-inch springform pan. Use the bottom of a flat glass or measuring cup to get a compact, even layer.
- Pro Tip: For extra security against leaks, especially if using a water bath, wrap the outside of your springform pan tightly with two layers of heavy-duty aluminum foil. Ensure the foil extends well above the top edge of the pan.
- Step 4: Bake the crust for 8-10 minutes, or until lightly golden. This pre-baking step helps create a crispier crust and prevents it from getting soggy. Remove from the oven and set aside to cool slightly while you prepare the filling.
Crafting the Velvety Filling
This is where the magic happens for classic cheesecake recipes – achieving that iconic creamy texture.
- Step 5: Reduce oven temperature to 325°F (160°C). In the bowl of a stand mixer fitted with the paddle attachment, or using a large bowl and a hand mixer, beat 32 ounces (four 8-ounce packages) of full-fat cream cheese on medium speed until completely smooth and creamy. Make sure there are no lumps. This should take about 3-5 minutes.
- Pro Tip: Don't overmix the cream cheese at this stage. You want it smooth, but not airy. Overmixing incorporates too much air, which can cause your cheesecake to puff up and then crack during cooling.
- Step 6: Gradually add 1 ¾ cups granulated sugar, beating on low-medium speed until just combined. Scrape down the sides of the bowl frequently.
- Step 7: Beat in 1 teaspoon pure vanilla extract and 1 tablespoon fresh lemon juice (this brightens the flavor beautifully).
- Step 8: Add ½ cup sour cream and mix on low speed until just incorporated. Again, do not overmix.
- Step 9: Add 4 large eggs, one at a time, beating on low speed only until each egg is just blended into the mixture. Scrape down the bowl after each addition. The mixture should be thick and smooth.
- Pro Tip: Adding eggs one at a time and mixing minimally prevents over-incorporation of air, which is a common culprit for cheesecake cracks.
Baking to Perfection
The baking process is crucial for preventing cracks in many cheesecake recipes.
- Step 10: Pour the cheesecake filling evenly over the pre-baked graham cracker crust in the springform pan. Gently tap the pan on the counter a few times to release any large air bubbles.
- Step 11: Prepare a water bath (Bain-Marie). Place the foil-wrapped springform pan into a larger roasting pan. Carefully pour hot water into the roasting pan until it comes halfway up the sides of the springform pan.
- Pro Tip: A water bath provides a moist, even heat environment, which helps the cheesecake bake slowly and evenly, preventing it from cracking. It's a game-changer for creamy cheesecake recipes!
- Step 12: Carefully transfer the roasting pan with the cheesecake to the preheated oven. Bake for 1 hour 15 minutes to 1 hour 30 minutes, or until the edges are set but the center (about 2-3 inches in diameter) still jiggles slightly when gently shaken.
- Pro Tip: An internal temperature of 150°F (65°C) in the center indicates it’s done.
Cooling and Chilling
Patience is a virtue, especially when it comes to cooling this cheesecake.
- Step 13: Once baked, turn off the oven and leave the cheesecake in the water bath inside the oven with the door ajar for 1 hour. This slow cooling prevents sudden temperature changes that can cause cracks.
- Step 14: Carefully remove the springform pan from the water bath and the roasting pan. Remove the foil. Let the cheesecake cool completely on a wire rack at room temperature for another 1-2 hours.
- Step 15: Once completely cool, cover the cheesecake loosely with plastic wrap and refrigerate for at least 6-8 hours, or preferably overnight. Chilling is essential for the cheesecake to fully set and achieve its proper dense, creamy texture.
- Pro Tip: For easy slicing, dip a sharp knife in hot water and wipe it clean between each cut.
Variations & Serving Suggestions
While this classic New York style cheesecake is perfect on its own, here are some ideas to customize it and make it your own among other cheesecake recipes:
Flavor Variations:
- Lemon Zest: Add 1-2 tablespoons of lemon zest to the filling for an even brighter, more pronounced citrus flavor.
- Chocolate Swirl: Melt 4 ounces of your favorite chocolate (dark or milk). After pouring the plain filling into the crust, drizzle the melted chocolate over the top and swirl gently with a knife for a beautiful marbled effect.
- Pumpkin Spice: For a seasonal twist, add 1 tablespoon of pumpkin pie spice and ½ cup of pumpkin puree to the cream cheese mixture. Adjust sugar to taste.
- Espresso: Dissolve 1-2 tablespoons of instant espresso powder in 1 tablespoon of hot water, then add to the cream cheese mixture for a rich coffee flavor.
Toppings Galore:
The beauty of classic cheesecake recipes is their versatility when it comes to toppings. Fresh fruit is always a winner!
- Fresh Berries: A simple topping of fresh strawberries, raspberries, blueberries, or a mix of all three adds a beautiful pop of color and natural sweetness.
- Cherry or Blueberry Compote: Cook down fresh or frozen cherries/blueberries with a little sugar and lemon juice until thickened for a homemade fruit topping.
- Chocolate Ganache: A rich, glossy chocolate ganache poured over the top is pure decadence.
- Caramel Sauce: Drizzled caramel sauce with a sprinkle of sea salt creates a delightful salty-sweet combination.
Serving Suggestions:
- Serve slices chilled with a dollop of whipped cream or a scoop of vanilla bean ice cream.
- Pair it with a strong cup of coffee, a glass of dessert wine, or a refreshing mint tea.
- For a special occasion, consider serving mini cheesecakes in individual ramekins for a personalized touch.
Looking for other delightful desserts? Don't miss my recipe for The Ultimate Homestyle Apple Pie Recipe or if you're craving something chewy, check out The Ultimate Soft & Chewy Chocolate Chip Cookie Recipe.
Nutrition Information
Here’s an estimate of the nutritional values for one serving of this delicious New York Style Cheesecake. Keep in mind that exact values can vary based on specific brands and portion sizes, but these provide a general guide to help you manage your dietary intake. This is one of those rich cheesecake recipes where moderation is key, but indulgence is absolutely worth it!
| Nutrient | Amount Per Serving |
|---|---|
| Calories | 480 kcal |
| Carbohydrate Content | 45g |
| Cholesterol Content | 160mg |
| Fat Content | 32g |
| Fiber Content | 1g |
| Protein Content | 8g |
| Saturated Fat Content | 19g |
| Serving Size | 1 slice (approx. 1/12th of cake) |
| Sodium Content | 280mg |
| Sugar Content | 35g |
| Trans Fat Content | 1g |
| Unsaturated Fat Content | 11g |
Once you've enjoyed your amazing cheesecake, remember that proper storage is key to keeping it fresh. Leftover slices can be stored in an airtight container in the refrigerator for up to 5 days. I highly recommend using quality Basics Glass Food Storage containers to keep your dessert fresh and delicious.
Conclusion
Baking a Classic New York Style Cheesecake is a rewarding experience, transforming simple ingredients into a truly unforgettable dessert. It’s one of those essential cheesecake recipes that every home baker should have in their repertoire. The rich, creamy texture, the delicate tang, and the buttery graham cracker crust come together to create a symphony of flavors that will leave everyone asking for more. Don't be intimidated by its reputation; with a little care and my step-by-step guide, you'll achieve cheesecake perfection. So go ahead, preheat your oven, gather your ingredients, and prepare to create a dessert masterpiece. Happy baking, and enjoy every decadent bite!
FAQs
How do I prevent my cheesecake from cracking?
The key to preventing cracks lies in three main factors: using room temperature ingredients to prevent overmixing and excess air, baking in a water bath to create a moist, even heating environment, and allowing the cheesecake to cool slowly, first in the turned-off oven, then at room temperature, before chilling.
Can I make cheesecake ahead of time?
Absolutely! Cheesecake is an excellent make-ahead dessert. It needs significant chilling time anyway, so preparing it a day or two in advance allows the flavors to meld and the texture to fully set. Store it covered loosely with plastic wrap in the refrigerator.
What's the best way to store leftover cheesecake?
Leftover cheesecake should be stored in an airtight container in the refrigerator. It will stay fresh for up to 5 days. For longer storage, you can freeze individual slices for up to 1 month, wrapped tightly in plastic wrap and then foil.
What's the difference between New York style and regular cheesecake?
New York style cheesecake typically uses more cream cheese and often incorporates sour cream or heavy cream, resulting in a denser, richer, and creamier texture than other cheesecake recipes. It usually has a simple graham cracker crust and is often baked in a water bath for its signature smooth, crack-free top.
Classic New York Style Cheesecake
- Total Time: 1 hour 45 minutes (plus chilling time)
- Yield: 12 servings 1x
Description
A rich, creamy, and velvety smooth cheesecake with a buttery graham cracker crust, baked to perfection using a water bath for a flawless, crack-free finish. This is one of the ultimate cheesecake recipes for any occasion.
Ingredients
1 1/2 cups graham cracker crumbs
1/4 cup granulated sugar (for crust)
1/2 teaspoon ground cinnamon
6 tablespoons unsalted butter, melted
32 ounces (four 8-ounce packages) full-fat cream cheese, softened at room temperature
1 3/4 cups granulated sugar (for filling)
1 teaspoon pure vanilla extract
1 tablespoon fresh lemon juice
1/2 cup sour cream, softened at room temperature
4 large eggs, at room temperature
Instructions
Step 1: Preheat your oven to 350°F (175°C). In a medium bowl, combine graham cracker crumbs, ¼ cup granulated sugar, and ½ teaspoon ground cinnamon. Mix thoroughly.
Step 2: Pour in 6 tablespoons of melted unsalted butter. Mix until the crumbs are evenly moistened and resemble wet sand.
Step 3: Press the crumb mixture firmly into the bottom and about 1 inch up the sides of a 9-inch springform pan. Use the bottom of a flat glass or measuring cup to get a compact, even layer. Wrap the outside of the springform pan tightly with two layers of heavy-duty aluminum foil.
Step 4: Bake the crust for 8-10 minutes, or until lightly golden. Remove from the oven and set aside to cool slightly.
Step 5: Reduce oven temperature to 325°F (160°C). In the bowl of a stand mixer fitted with the paddle attachment, or using a large bowl and a hand mixer, beat the softened cream cheese on medium speed until completely smooth and creamy (3-5 minutes).
Step 6: Gradually add 1 ¾ cups granulated sugar, beating on low-medium speed until just combined. Scrape down the sides of the bowl frequently.
Step 7: Beat in 1 teaspoon pure vanilla extract and 1 tablespoon fresh lemon juice.
Step 8: Add ½ cup sour cream and mix on low speed until just incorporated. Do not overmix.
Step 9: Add the 4 large eggs, one at a time, beating on low speed only until each egg is just blended into the mixture. Scrape down the bowl after each addition. The mixture should be thick and smooth.
Step 10: Pour the cheesecake filling evenly over the pre-baked graham cracker crust in the springform pan. Gently tap the pan on the counter a few times to release any large air bubbles.
Step 11: Prepare a water bath (Bain-Marie). Place the foil-wrapped springform pan into a larger roasting pan. Carefully pour hot water into the roasting pan until it comes halfway up the sides of the springform pan.
Step 12: Carefully transfer the roasting pan with the cheesecake to the preheated oven. Bake for 1 hour 15 minutes to 1 hour 30 minutes, or until the edges are set but the center (about 2-3 inches in diameter) still jiggles slightly when gently shaken.
Step 13: Once baked, turn off the oven and leave the cheesecake in the water bath inside the oven with the door ajar for 1 hour.
Step 14: Carefully remove the springform pan from the water bath and the roasting pan. Remove the foil. Let the cheesecake cool completely on a wire rack at room temperature for another 1-2 hours.
Step 15: Once completely cool, cover the cheesecake loosely with plastic wrap and refrigerate for at least 6-8 hours, or preferably overnight. For easy slicing, dip a sharp knife in hot water and wipe it clean between each cut.
Notes
Always use room temperature ingredients for a smooth batter. A water bath is crucial for preventing cracks. Allow ample time for chilling; it's essential for the cheesecake to set properly.
- Prep Time: 30 minutes
- Cook Time: 1 hour 15 minutes
- Category: Dessert
- Cuisine: American
Nutrition
- Serving Size: 1 slice (approx. 1/12th of cake)
- Calories: 480 kcal
- Sugar: 35g
- Sodium: 280mg
- Fat: 32g
- Saturated Fat: 19g
- Unsaturated Fat: 11g
- Trans Fat: 1g
- Carbohydrates: 45g
- Fiber: 1g
- Protein: 8g
- Cholesterol: 160mg
Leave a Reply