The scent of cinnamon and pine, the twinkle of fairy lights, and the joyous chaos of holiday crafting – these are the memories that instantly transport me back to my grandmother’s kitchen. Every year, without fail, we’d gather around her worn wooden table, hands dusted with flour, to make our cherished salt dough ornaments recipe. It wasn't just about creating decorations; it was about shared laughter, sticky fingers, and the simple magic of transforming humble ingredients into something beautiful and lasting. I remember one year, my little brother accidentally ate a piece of the dough (don't worry, he was fine!), and it became a legendary family story. This tradition, steeped in warmth and creativity, is one I've carried into my own home, and today, I'm thrilled to share this timeless, easy, and utterly charming salt dough ornaments recipe with you. It’s perfect for crafting with kids, creating personalized gifts, or simply adding a touch of handmade charm to your own holiday decor. Let's dive into making the best salt dough ornaments recipe!
Why This Salt Dough Ornaments Recipe is a Must-Try
- Inexpensive & Accessible Fun: This salt dough ornaments recipe uses basic pantry staples you likely already have: flour, salt, and water. No fancy equipment or expensive craft supplies are needed, making it an incredibly budget-friendly activity for families, classrooms, or anyone looking for a creative outlet.
- Kid-Friendly Creativity: Salt dough is wonderfully forgiving and easy for little hands to manipulate. Kids love rolling, cutting, and decorating their own creations. It's a fantastic way to develop fine motor skills and encourage imaginative play. This salt dough ornaments recipe is perfect for all ages.
- Personalized & Memorable Gifts: Handmade gifts carry so much more meaning. With this salt dough ornaments recipe, you can create custom ornaments featuring handprints, names, or special dates, turning them into cherished keepsakes for friends, family, and teachers. Imagine the joy of receiving a tiny handprint ornament from a loved one!
- Durable Keepsakes That Last: When properly dried and sealed, salt dough ornaments can last for years, becoming precious mementos that bring back fond memories each holiday season. They're not just decorations; they're tangible pieces of your family's history, created with this wonderful salt dough ornaments recipe.
Key Ingredient Notes for Your Salt Dough Ornaments Recipe
While the ingredients for this salt dough ornaments recipe are incredibly simple, understanding their role can help you achieve the best results.
All-Purpose Flour
This is the foundation of your salt dough. Any standard all-purpose flour will work perfectly. It provides the structure for your ornaments. Do NOT substitute with self-rising flour, as the leavening agents will cause your ornaments to puff up and distort their shape during baking. Stick to basic all-purpose for the optimal salt dough ornaments recipe.
Fine Salt
Salt is not just for flavor; it’s crucial for the texture and preservation of your salt dough ornaments. Fine-grained salt (like table salt) is recommended because it dissolves better and creates a smoother, more uniform dough. Coarse salts might leave a grainy texture and make the dough harder to work with. The high salt content is what helps preserve the ornaments over time, preventing spoilage and helping them dry out thoroughly. This is a key component of a successful salt dough ornaments recipe.
Warm Water
Warm water helps the salt dissolve more easily and creates a more pliable, smoother dough. While cold water will eventually work, warm water speeds up the process and makes kneading a bit less strenuous. Add it gradually to achieve the perfect consistency – you want a dough that’s firm but not sticky. This careful addition of water is vital for your salt dough ornaments recipe.
Step-by-Step Guide with Pro Tips for Your Salt Dough Ornaments Recipe
Getting hands-on with this salt dough ornaments recipe is where the real fun begins! Follow these detailed steps for beautiful, long-lasting ornaments.
Step 1: In a large mixing bowl, combine the flour and salt thoroughly. Use a whisk or a spoon to ensure an even distribution. This initial mixing is important for the consistency of your salt dough ornaments recipe.
Step 2: Gradually add the warm water, about 1/4 cup at a time, mixing with a spoon until a shaggy dough forms. Once it starts to come together, use your hands to bring the dough into a ball. You might not need all the water, or you might need a tiny bit more – the goal is a dough that's firm but not sticky.
Step 3: Turn the dough out onto a lightly floured surface and knead for 5-10 minutes. This develops the gluten, making the dough smooth and elastic. It should feel like play-dough – firm but pliable. If it’s too sticky, add a little more flour; if too dry, add a few drops of water. This kneading is crucial for a smooth salt dough ornaments recipe.
Step 4: Using a rolling pin, roll out the dough to about 1/4 inch thickness. For small, intricate designs, you might go slightly thinner, but 1/4 inch is generally ideal for durability. Make sure your surface and rolling pin are lightly floured to prevent sticking. For easy cleanup and consistent thickness, you can roll the dough between two sheets of parchment paper. A consistent thickness across all ornaments helps them bake evenly.
Step 5: Use cookie cutters, a knife, or even your hands to cut out desired shapes. For ornaments, remember to use a straw or a skewer to poke a hole at the top of each shape BEFORE baking. This hole will be for threading ribbon or string later. Gently transfer the cut-out shapes to a baking sheet lined with parchment paper.
Step 6: Bake the ornaments in a preheated oven at the lowest possible temperature (around 200°F / 95°C) for 2-3 hours, or until completely hardened and dry. The baking time will vary depending on the thickness and size of your ornaments. Thicker ornaments will take longer. The key is slow drying to prevent cracking. You can also air dry them for 2-3 days, flipping them occasionally, but baking ensures they dry thoroughly and evenly. After about an hour, you might want to carefully flip them over to ensure even drying. Check out our Ultimate Easy Salt Dough Recipe for more general tips.
Step 7: Once completely dry, remove from the oven and let cool completely on a wire rack. They must be entirely cool before decorating. Now for the fun part! Decorate your dried ornaments with acrylic paints, glitter, markers, or even glue on small beads or sequins. Once decorated and fully dry, seal your ornaments with a clear acrylic spray sealant or Mod Podge. This protects the paint, adds a nice finish, and helps preserve your beautiful creations, making your salt dough ornaments recipe truly complete.
Variations & Decoration Ideas for Your Salt Dough Ornaments Recipe
The beauty of this salt dough ornaments recipe lies in its versatility. Once your ornaments are baked and cooled, the decorating possibilities are endless!
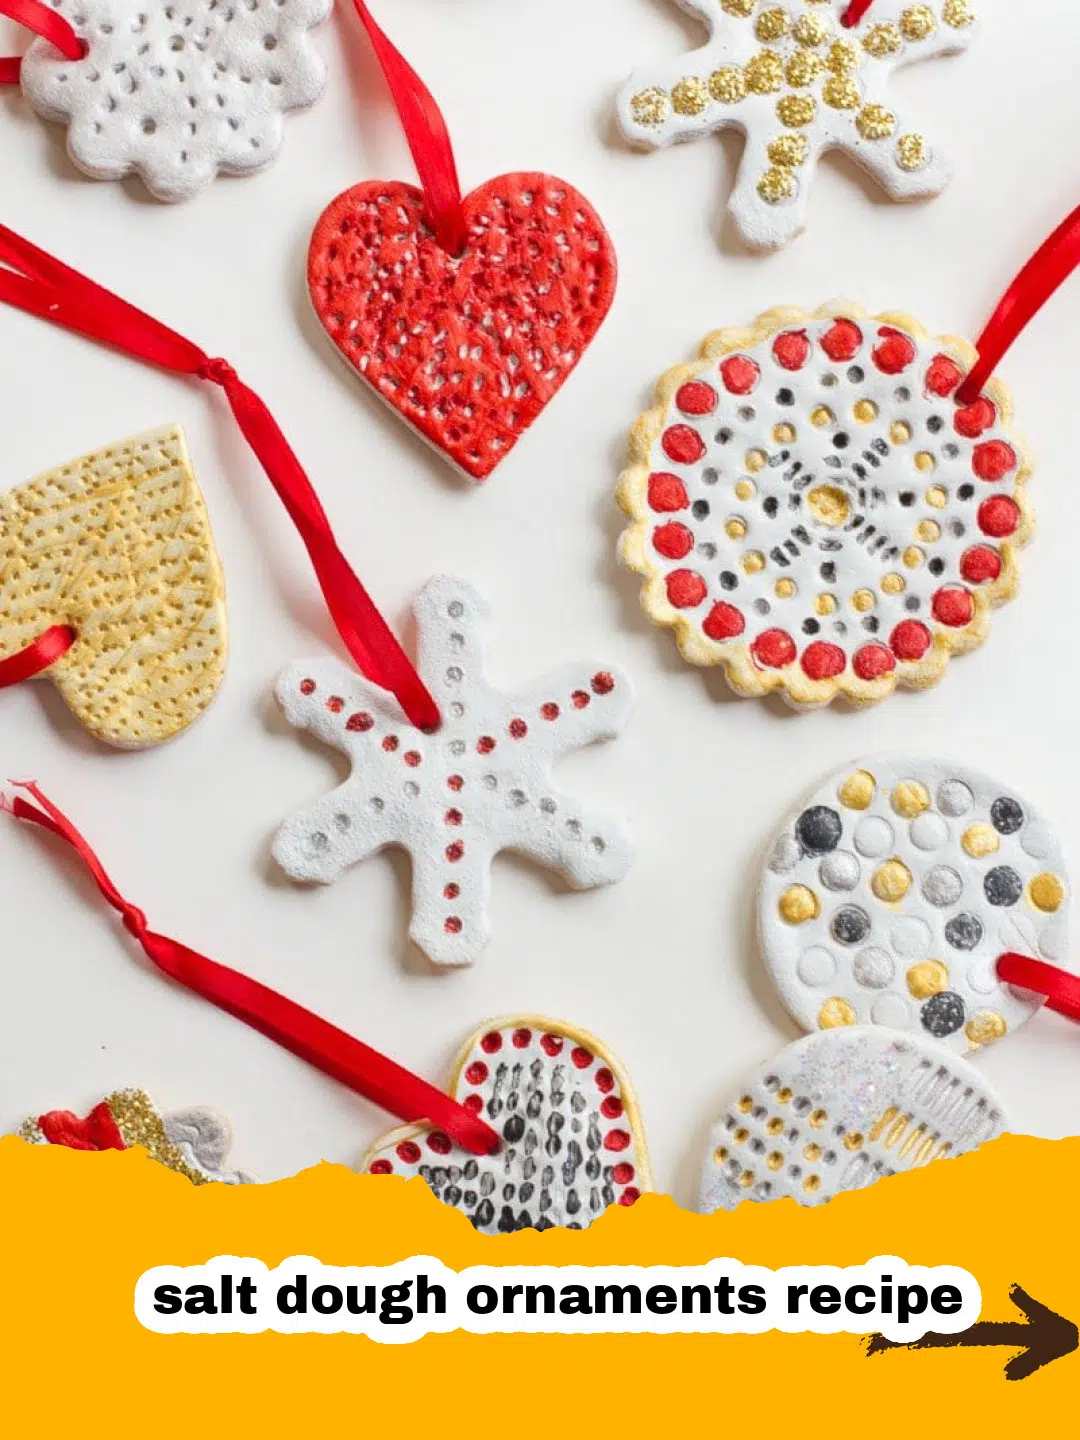
- Paints and Glitter: Acrylic paints are perfect for salt dough. Let your imagination run wild with colors, patterns, and designs. Apply glitter while the paint is still wet for extra sparkle, or use glitter glue once the paint has dried.
- Stamping and Textures: Before baking, you can press various items into the rolled-out dough to create textures. Think lace, leaves, rubber stamps, or even textured rolling pins. This adds an elegant touch to your salt dough ornaments recipe.
- Scented Ornaments: While you can add a touch of cinnamon or other spices to the dough for a subtle scent, for a stronger aroma, you can add a few drops of essential oils (like cinnamon, orange, or pine) to the *back* of the ornaments after they are baked and cooled, or on a cotton ball glued to the back. Do not add essential oils to the dough before baking as they may degrade.
- Handprint/Footprint Ornaments: These are incredibly popular for babies and young children. Simply press a hand or foot firmly into a thick piece of rolled-out dough (about 1/2 inch) before cutting and baking. These make truly precious keepsakes.
- Gift Tags and Place Cards: Instead of just ornaments, use smaller cookie cutters to create unique gift tags for presents or charming place cards for your holiday dinner table.
- Personalized Magnets: Skip the hole, paint and seal, then glue a strong magnet to the back of your finished salt dough shapes for festive fridge decor.
Remember to store any leftover dough in an airtight container or a product like Basics Glass Food Storage in the refrigerator for a few days if you want to make more later, although fresh dough is always best for your salt dough ornaments recipe.
Nutrition Information
Please note: This salt dough ornaments recipe is for craft purposes only and is not intended for human or animal consumption. The nutritional information provided below is a hypothetical estimate for a single small ornament, provided solely for schema compliance and should not be used as dietary advice. Salt dough is extremely high in sodium and is not food.
| Nutrient | Amount Per Ornament (Hypothetical, NOT for consumption) |
|---|---|
| Calories | 5 kcal |
| Carbohydrate Content | 1g |
| Cholesterol Content | 0mg |
| Fat Content | 0g |
| Fiber Content | 0g |
| Protein Content | 0g |
| Saturated Fat Content | 0g |
| Serving Size | Not for consumption |
| Sodium Content | 1000mg+ |
| Sugar Content | 0g |
| Trans Fat Content | 0g |
| Unsaturated Fat Content | 0g |
Conclusion
There's something truly special about the simple act of creating with your hands, especially when it results in something as charming and meaningful as a handmade ornament. This classic salt dough ornaments recipe isn't just about mixing flour and salt; it's about making memories, sparking creativity, and adding a personal touch to your home and gifts. Whether you're making them with children, as a thoughtful gift, or just for yourself, these salt dough creations bring a warmth and authenticity that store-bought decorations simply can't match. So gather your ingredients, clear your table, and enjoy the process of bringing this timeless craft to life. Happy crafting, and may your homemade ornaments sparkle with joy for years to come! We hope you love this salt dough ornaments recipe.
FAQs
How long do salt dough ornaments last?
When properly dried and sealed with a clear acrylic spray or Mod Podge, salt dough ornaments can last for many years, becoming cherished keepsakes. Proper storage in a dry place also helps extend their lifespan.
Can you eat salt dough ornaments?
No, salt dough ornaments are NOT for consumption. While made from common food ingredients, the high salt content makes them inedible and potentially harmful if ingested in large quantities. This recipe is strictly for craft purposes.
How do you prevent salt dough from cracking?
To prevent cracking, bake salt dough ornaments at a very low temperature (around 200u00b0F / 95u00b0C) for a longer period. Slow and even drying is key. Ensure the dough is rolled to a consistent thickness, and allow them to cool completely before decorating. Flipping them once or twice during baking can also help.
What kind of paint should I use for salt dough ornaments?
Acrylic paints are ideal for decorating salt dough ornaments once they are completely dry and cooled. They provide vibrant colors and adhere well. You can also use paint pens or markers for fine details. Always seal the painted ornaments afterwards for protection.

Classic Salt Dough Ornaments
- Total Time: 2 hours 50 minutes (plus cooling and decoration time)
- Yield: 15-20 ornaments (depending on size) 1x
Description
A simple and timeless salt dough ornaments recipe for creating beautiful, durable, and inexpensive decorations. Perfect for holiday crafting, personalized gifts, and kid-friendly fun. Note: This recipe is for craft purposes only and is NOT for consumption.
Ingredients
2 cups all-purpose flour
1 cup fine table salt
1 cup warm water (or slightly more/less, as needed)
Optional: Acrylic paints, glitter, clear sealant spray, ribbon/twine for hanging
Instructions
Step 1: In a large mixing bowl, combine the flour and salt thoroughly. Use a whisk or a spoon to ensure an even distribution.
Step 2: Gradually add the warm water, about 1/4 cup at a time, mixing with a spoon until a shaggy dough forms. Once it starts to come together, use your hands to bring the dough into a ball.
Step 3: Turn the dough out onto a lightly floured surface and knead for 5-10 minutes. This develops the gluten, making the dough smooth and elastic. It should feel like play-dough – firm but pliable.
Step 4: Using a rolling pin, roll out the dough to about 1/4 inch thickness. For small, intricate designs, you might go slightly thinner, but 1/4 inch is generally ideal for durability.
Step 5: Use cookie cutters, a knife, or even your hands to cut out desired shapes. For ornaments, remember to use a straw or a skewer to poke a hole at the top of each shape BEFORE baking. Gently transfer the cut-out shapes to a baking sheet lined with parchment paper.
Step 6: Bake the ornaments in a preheated oven at the lowest possible temperature (around 200°F / 95°C) for 2-3 hours, or until completely hardened and dry. The baking time will vary depending on the thickness and size of your ornaments. Thicker ornaments will take longer. The key is slow drying to prevent cracking.
Step 7: Once completely dry, remove from the oven and let cool completely on a wire rack. They must be entirely cool before decorating. Decorate your dried ornaments with acrylic paints, glitter, markers, or even glue on small beads or sequins. Once decorated and fully dry, seal your ornaments with a clear acrylic spray sealant or Mod Podge to protect them and add a nice finish.
Notes
Always ensure ornaments are completely dry before decorating and sealing to prevent mold and cracking. This recipe is for decorative crafts, not for eating.
- Prep Time: 20 minutes
- Cook Time: 2 hours 30 minutes
- Category: Crafts, Holiday
- Cuisine: N/A (Craft)
Nutrition
- Serving Size: Not for consumption
- Calories: 5 kcal
- Sugar: 0g
- Sodium: 1000mg+
- Fat: 0g
- Saturated Fat: 0g
- Unsaturated Fat: 0g
- Trans Fat: 0g
- Carbohydrates: 1g
- Fiber: 0g
- Protein: 0g
- Cholesterol: 0mg
Leave a Reply