There’s a certain magic that fills the air when the holidays approach, isn’t there? For me, it’s not just about the festive lights or the scent of pine; it’s about traditions, especially those cherished moments spent with loved ones creating something beautiful. One of my fondest memories growing up involves my grandmother, her kitchen table dusted with flour, and the delightful aroma of homemade cookies mingling with something else… something savory and earthy. That’s where my journey with the classic **Salt dough ornaments recipe** began. I must have been about seven, my tiny hands clumsy but eager, rolling out the dough alongside her. She'd tell stories of her childhood, of simpler times when homemade decorations were not just a craft but a necessity, imbued with love and personal history. Each year, we’d hang those lumpy, oddly shaped, but infinitely precious salt dough ornaments on our Christmas tree. The joy of seeing those humble creations sparkle under the twinkling lights is a feeling I carry with me to this day, and it's a tradition I've proudly passed on. This year, why not create your own lasting memories with this incredibly simple and rewarding salt dough ornaments recipe?
Why This Salt Dough Ornaments Recipe is a Must-Try
Beyond the sentimental value, there are so many practical reasons why this salt dough ornaments recipe is a fantastic project for families, crafters, and anyone looking for a touch of handmade charm:
- Budget-Friendly Fun: You likely already have all the ingredients in your pantry! Flour, salt, and water are all it takes to make the basic dough, making this an incredibly economical craft.
- Creative Expression for All Ages: From toddlers making handprint ornaments to older kids decorating intricate designs, this salt dough ornaments recipe is wonderfully versatile. It encourages creativity and fine motor skills in younger participants.
- Long-Lasting Keepsakes: Once baked and properly sealed, your salt dough ornaments can last for years, becoming cherished mementos that bring back happy memories each time they’re displayed.
- Personalized Decor: Forget generic store-bought decorations! With this salt dough ornaments recipe, you can create pieces that perfectly match your home decor or celebrate specific milestones, making your holiday setup truly unique.
Key Ingredient Notes for Your Salt Dough Ornaments Recipe
While the beauty of a salt dough ornaments recipe lies in its simplicity, understanding your core ingredients can make a big difference in the final product:
All-Purpose Flour: The Foundation
Standard all-purpose flour is your best friend here. It provides the structure for your dough. You don't need fancy bread flour or delicate cake flour; the robustness of all-purpose is perfect for crafting. The key is to measure accurately. Too much flour will make your dough crumbly and hard to work with, while too little will result in a sticky mess. If you find your dough is too sticky, add a little extra flour a teaspoon at a time. If it's too dry, a tiny splash of water can save it. Consistency is king for a perfect salt dough ornaments recipe.
Fine Grain Salt: The Preservative Powerhouse
Don't skimp on the salt! Not only does it help with the dough's texture, but it also acts as a natural preservative, inhibiting mold and keeping your ornaments intact for years to come. Fine grain salt, like table salt, works best as it dissolves and integrates smoothly into the dough. Coarse salts might leave noticeable granules in your finished salt dough ornaments. Ensure it's fully incorporated for the best results in your salt dough ornaments recipe.
Water: The Binding Agent
Tap water is perfectly fine for this salt dough ornaments recipe. The amount of water needed can vary slightly depending on your flour and humidity levels. Start with the recommended amount and add more very gradually if the dough is too dry. You're looking for a dough that's firm, pliable, and not sticky – similar to sugar cookie dough. Warm water can sometimes help the salt dissolve faster, but it’s not strictly necessary. Using the right amount of water is crucial for a workable salt dough ornaments recipe.
Step-by-Step Guide to the Perfect Salt Dough Ornaments Recipe with Pro Tips
Ready to get crafting? This simple salt dough ornaments recipe will guide you through creating beautiful, lasting decorations. Follow these steps carefully for the best results.
- Step 1: Preheat your oven to its lowest setting, typically around 200°F (95°C). Line a baking sheet with parchment paper for easy removal and to prevent sticking.
- Step 2: In a large mixing bowl, combine the all-purpose flour and fine grain salt. Whisk them together thoroughly to ensure the salt is evenly distributed. This is a crucial first step for a consistent salt dough ornaments recipe.
- Step 3: Gradually add the warm water to the flour and salt mixture, stirring continuously. Start with 3/4 cup and add more, a tablespoon at a time, if the dough is too dry. Mix until a shaggy dough forms.
- Step 4: Turn the dough out onto a lightly floured surface. Knead the dough for 5-10 minutes until it becomes smooth, pliable, and no longer sticky. If it's too sticky, add a little more flour; if it's too dry, a tiny bit more water. The perfect consistency is key for beautiful salt dough ornaments.
- Step 5: Roll out the dough to an even thickness, about 1/4 inch (0.6 cm). If the dough is too thin, it might break easily; too thick, and it will take longer to bake and dry. For consistent salt dough ornaments, use spacers if you have them.
- Step 6: Use cookie cutters to cut out your desired shapes. For handprints or other unique designs, simply press your hand or object into the rolled-out dough. Carefully transfer the cutouts to the prepared baking sheet.
- Step 7: Using a straw or a skewer, poke a small hole near the top of each ornament if you plan to hang them. Make sure the hole is large enough for ribbon or string after baking. Don't forget this step, or your salt dough ornaments won't be hangable!
- Step 8: Bake the ornaments in the preheated oven for 2 hours, or until completely dry and hard. Baking time can vary depending on the thickness of your ornaments. Thicker pieces might need more time or a slightly lower temperature to prevent browning. You want them hard, not crispy brown.
- Step 9: Once baked, turn off the oven and leave the ornaments inside to cool completely for several hours or overnight. This slow cooling helps prevent cracking. After they are fully cool, they are ready for decorating.
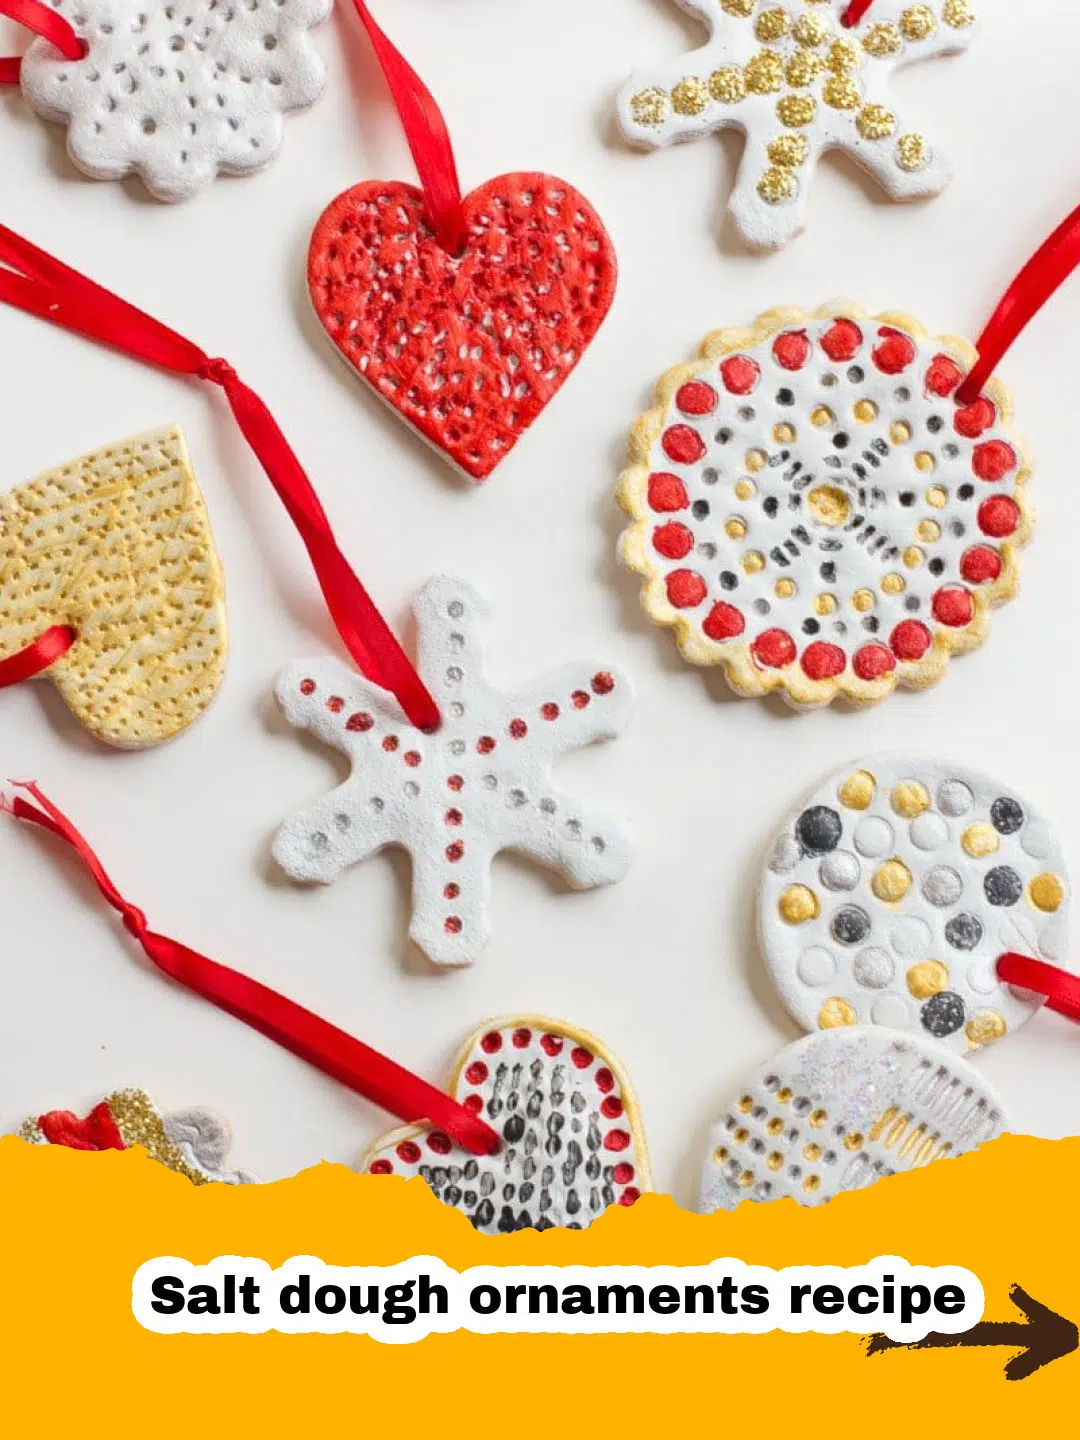
- Step 10: Decorate your cooled salt dough ornaments with acrylic paints, markers, glitter, or other craft supplies. Let the decorations dry completely. For added durability and shine, apply a clear craft sealant (like Mod Podge or clear varnish) to both sides. This protects your salt dough ornaments for years.
Variations & Creative Ideas for Your Salt Dough Ornaments Recipe
The magic of this salt dough ornaments recipe truly shines in its versatility! Once you've mastered the basic dough, the possibilities for customization are endless. Here are some ideas to spark your imagination:
- Coloring the Dough: For vibrant, unpainted ornaments, knead a few drops of food coloring into your dough. This works best with lighter colors as the baking process can deepen the shade. Imagine a batch of green salt dough Christmas trees or blue snowflakes!
- Adding Texture & Imprints: Before baking, press natural elements like leaves, twigs, or lace onto the rolled-out dough for beautiful imprints. Cookie stamps or rubber stamps can also create intricate patterns. These textured pieces add another dimension to your salt dough ornaments.
- Glitter & Embellishments: After baking and cooling, once your paint or sealant is dry, add a touch of sparkle with craft glitter. You can also glue on small beads, sequins, or even tiny buttons for extra charm. This step truly personalizes your salt dough ornaments recipe creations.
- Scented Ornaments: Want your ornaments to smell as good as they look? Knead in a teaspoon of cinnamon, nutmeg, or pumpkin spice into your dough. Be aware that baking might lessen the scent, but it's a lovely touch, especially for festive salt dough ornaments.
- Gift Tags & Name Plates: Cut out small rectangles or ovals from your salt dough. Once baked and cooled, write names or short messages on them with a permanent marker or paint pen. These make wonderful, personalized gift tags that can double as a small keepsake. The versatility of this salt dough ornaments recipe extends beyond just tree decorations!
- Pet Paw Prints: For a truly adorable keepsake, gently press your pet's paw into a small piece of rolled-out dough. Trim around the paw print, poke a hole for hanging, and bake. This makes a precious memento, especially around the holidays.
- A Potpourri of Possibilities: Don't forget, these ornaments don't have to be just for the Christmas tree. Use them as rustic garland elements, tie them onto gifts, or even create a permanent floral arrangement with painted salt dough flowers. For storage of your finished, painted, and sealed salt dough ornaments, consider using Basics Glass Food Storage containers to keep them protected from dust and moisture until next season. This ensures your hard work from this salt dough ornaments recipe lasts!
Nutrition Information
Please note: This salt dough ornaments recipe is for decorative purposes only and is not intended for consumption. The nutrition information below is an approximate estimate for the *dough itself* (per 100g) and not for a serving of food. We strongly advise against eating salt dough.
| Nutrient | Amount |
|---|---|
| Calories | Not for consumption |
| Carbohydrate Content | Not for consumption |
| Cholesterol Content | Not for consumption |
| Fat Content | Not for consumption |
| Fiber Content | Not for consumption |
| Protein Content | Not for consumption |
| Saturated Fat Content | Not for consumption |
| Serving Size | N/A (decorative item) |
| Sodium Content | High (due to salt, not for consumption) |
| Sugar Content | Not for consumption |
| Trans Fat Content | Not for consumption |
| Unsaturated Fat Content | Not for consumption |
There you have it – a timeless and heartwarming **Salt dough ornaments recipe** that promises not just beautiful decorations, but also precious memories. Whether you're a seasoned crafter or just starting a new family tradition, the simplicity and versatility of salt dough make it a perfect project. Gather your loved ones, roll up your sleeves, and let the creativity flow. Before you go, don't forget to check out The Ultimate Collection of Festive Christmas Cookies Recipes for a Magical Holiday Season for more holiday inspiration, and for more crafting fun, explore The Ultimate Classic Salt Dough Recipe for Creative Crafts. Happy crafting and happy holidays!
FAQs
How long do salt dough ornaments last?
When properly baked and sealed with a craft sealant, salt dough ornaments can last for many years, even decades. Storing them in a cool, dry place away from humidity will help preserve them best.
Can I make salt dough ornaments without baking?
Yes, salt dough ornaments can air dry, but it takes significantly longer (several days to a week or more, depending on thickness and humidity). Baking speeds up the process and generally leads to a more durable, harder ornament. If air-drying, flip them periodically to ensure even drying.
What kind of paint is best for salt dough ornaments?
Acrylic paints are ideal for decorating salt dough ornaments once they are fully baked and cooled. They provide vibrant colors and good coverage. You can also use craft markers or even permanent markers for fine details.
How can I prevent my salt dough ornaments from cracking?
To prevent cracking, ensure your dough has the right consistency u2013 not too dry or too wet. Bake the ornaments at a low temperature for a longer period, and allow them to cool slowly in the oven before removing. Applying a sealant after decorating also adds a protective layer.

Classic Salt Dough Ornaments
- Total Time: 2 hours 20 minutes (plus cooling/drying time)
- Yield: Approximately 15-20 medium ornaments 1x
Description
A timeless and easy-to-follow salt dough ornaments recipe perfect for creating personalized, long-lasting decorations and cherished family memories. Ideal for holiday crafting with kids or for adding a handmade touch to your home.
Ingredients
2 cups all-purpose flour
1 cup fine grain salt (table salt)
3/4 cup warm water (approximate, adjust as needed)
Optional: Food coloring, glitter, paint, sealant, cookie cutters, straw/skewer for holes
Instructions
Step 1: Preheat your oven to its lowest setting, typically around 200°F (95°C). Line a baking sheet with parchment paper for easy removal and to prevent sticking.
Step 2: In a large mixing bowl, combine the all-purpose flour and fine grain salt. Whisk them together thoroughly to ensure the salt is evenly distributed. This is a crucial first step for a consistent salt dough ornaments recipe.
Step 3: Gradually add the warm water to the flour and salt mixture, stirring continuously. Start with 3/4 cup and add more, a tablespoon at a time, if the dough is too dry. Mix until a shaggy dough forms.
Step 4: Turn the dough out onto a lightly floured surface. Knead the dough for 5-10 minutes until it becomes smooth, pliable, and no longer sticky. If it's too sticky, add a little more flour; if it's too dry, a tiny bit more water. The perfect consistency is key for beautiful salt dough ornaments.
Step 5: Roll out the dough to an even thickness, about 1/4 inch (0.6 cm). If the dough is too thin, it might break easily; too thick, and it will take longer to bake and dry. For consistent salt dough ornaments, use spacers if you have them.
Step 6: Use cookie cutters to cut out your desired shapes. For handprints or other unique designs, simply press your hand or object into the rolled-out dough. Carefully transfer the cutouts to the prepared baking sheet.
Step 7: Using a straw or a skewer, poke a small hole near the top of each ornament if you plan to hang them. Make sure the hole is large enough for ribbon or string after baking. Don't forget this step, or your salt dough ornaments won't be hangable!
Step 8: Bake the ornaments in the preheated oven for 2 hours, or until completely dry and hard. Baking time can vary depending on the thickness of your ornaments. Thicker pieces might need more time or a slightly lower temperature to prevent browning. You want them hard, not crispy brown.
Step 9: Once baked, turn off the oven and leave the ornaments inside to cool completely for several hours or overnight. This slow cooling helps prevent cracking. After they are fully cool, they are ready for decorating.
Step 10: Decorate your cooled salt dough ornaments with acrylic paints, markers, glitter, or other craft supplies. Let the decorations dry completely. For added durability and shine, apply a clear craft sealant (like Mod Podge or clear varnish) to both sides. This protects your salt dough ornaments for years.
Notes
Ensure ornaments are fully dry before decorating or sealing to prevent mold. For best preservation, store in a cool, dry place.
- Prep Time: 20 minutes
- Cook Time: 2 hours (plus cooling)
- Category: Crafts, Holiday Decorations
- Cuisine: N/A (Crafting)
Nutrition
- Serving Size: N/A (decorative item)
- Calories: Not for consumption
- Sugar: Not for consumption
- Sodium: High (due to salt, not for consumption)
- Fat: Not for consumption
- Saturated Fat: Not for consumption
- Unsaturated Fat: Not for consumption
- Trans Fat: Not for consumption
- Carbohydrates: Not for consumption
- Fiber: Not for consumption
- Protein: Not for consumption
- Cholesterol: Not for consumption
Leave a Reply