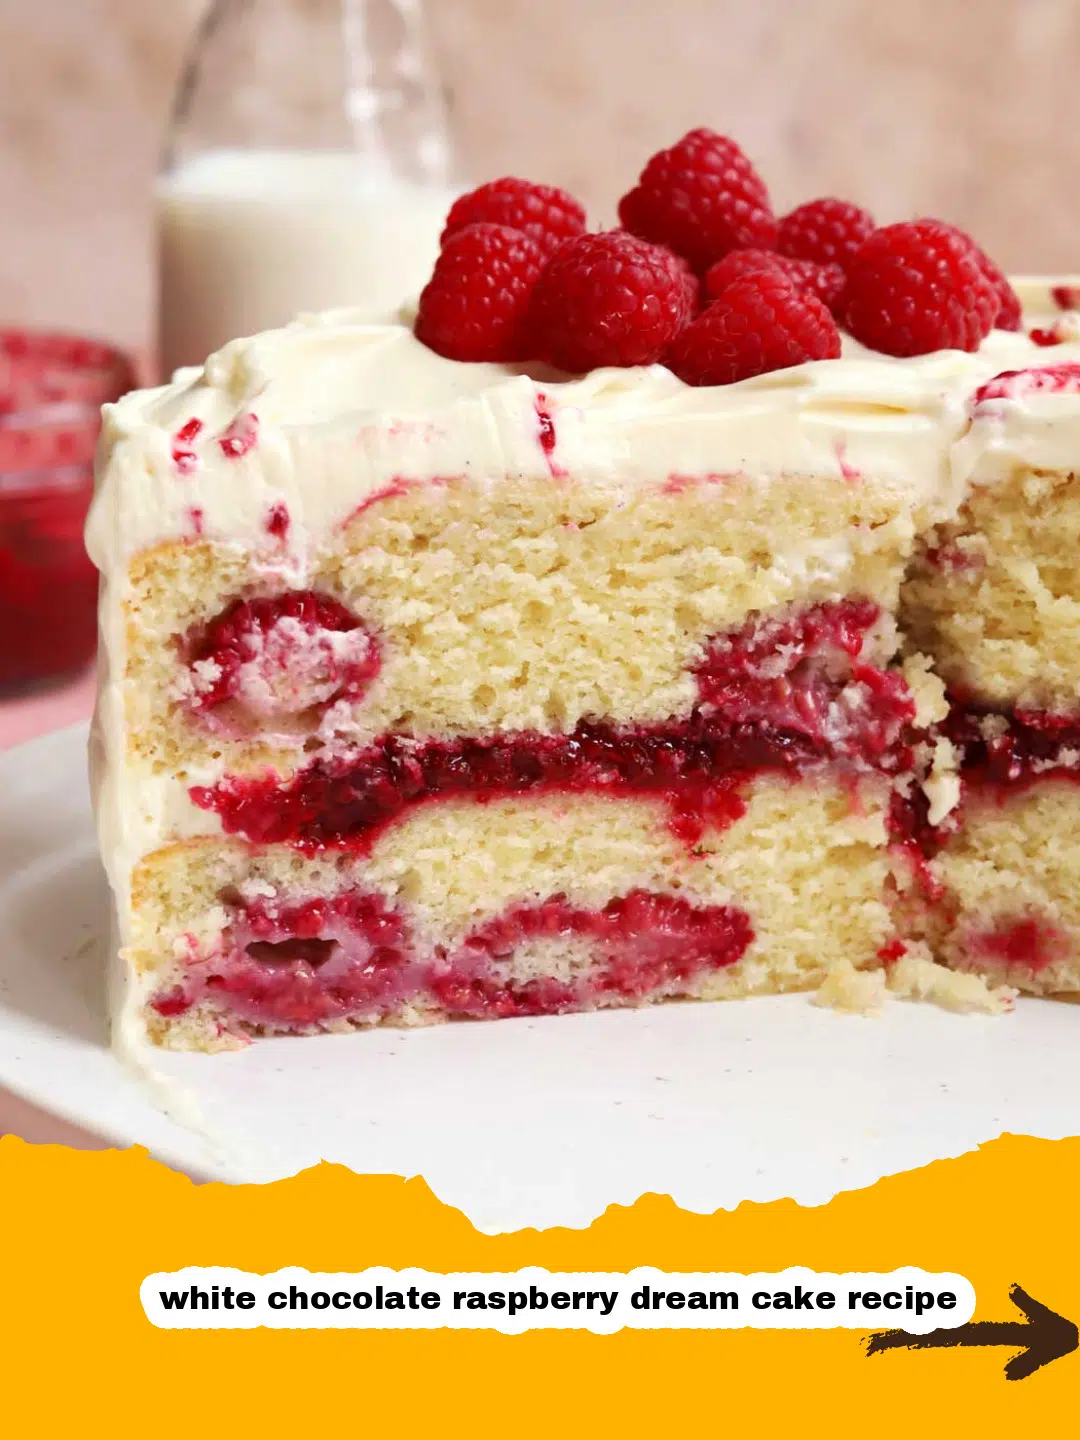
There are some recipes that just stick with you, becoming synonymous with joy, celebration, and pure indulgence. For me, that recipe is the white chocolate raspberry dream cake recipe. I remember the first time I attempted to bake a multi-layered cake. It was for my sister's birthday years ago, and I wanted something truly special. I envisioned a cake that was elegant yet comforting, sophisticated yet approachable. After several trials and errors, countless tweaks to the batter, and a glorious battle with cream cheese frosting, this white chocolate raspberry dream cake recipe was born. The look on her face when she saw it, adorned with fresh raspberries and delicate white chocolate curls, was priceless. Since then, it’s become a staple for every significant occasion, a testament to how simple, quality ingredients can create something truly magical. It’s more than just a cake; it’s a memory-maker, a conversation starter, and a slice of pure happiness.
Why This Recipe is a Must-Try
- Unforgettable Flavor Combination: The delicate sweetness of white chocolate perfectly complements the bright, tart burst of fresh raspberries, creating a harmonious balance that will tantalize your taste buds. This white chocolate raspberry dream cake recipe is a flavor journey.
- Luxurious Texture: Featuring a tender, moist white chocolate cake, a luscious raspberry filling, and a silky cream cheese frosting, every bite offers a delightful interplay of textures. It's truly a dream come true for your palate.
- Impressive Presentation: Despite its decadent taste, this cake is surprisingly easy to assemble into a show-stopping dessert that’s perfect for birthdays, anniversaries, or any occasion that calls for something extraordinary. Your guests will be amazed by this white chocolate raspberry dream cake recipe.
- Crowd-Pleasing Elegance: Whether you're a seasoned baker or a kitchen novice, this recipe delivers professional-level results that will have everyone asking for seconds (and the recipe!).
Key Ingredient Notes
Crafting the perfect white chocolate raspberry dream cake recipe begins with understanding your core ingredients. Each component plays a vital role in achieving that ethereal flavor and texture.
High-Quality White Chocolate
When we talk about the white chocolate raspberry dream cake recipe, the white chocolate is non-negotiable. Don't skimp here! Opt for a good quality white chocolate bar or baking discs, ideally with a higher percentage of cocoa butter. Avoid candy melts or artificially flavored white chocolate chips if you want that truly rich, creamy flavor. Good white chocolate melts smoothly and incorporates beautifully into the cake batter and the frosting, imparting a delicate, sweet richness that cheap alternatives simply can't match. It’s the subtle backbone of this white chocolate raspberry dream cake recipe.
Fresh Raspberries are Key
While frozen raspberries can work in a pinch for the filling (just thaw them and drain any excess liquid), fresh raspberries are absolutely essential for garnish and add an unparalleled brightness to the filling itself. Their vibrant color and tart flavor cut through the sweetness of the white chocolate and frosting, creating that perfect balance that makes this white chocolate raspberry dream cake recipe so special. When selecting, look for plump, firm berries with a deep red color. Gently wash and pat them dry just before use to maintain their delicate structure.
Cake Flour for a Tender Crumb
For the ultimate soft and tender crumb in your white chocolate raspberry dream cake recipe, cake flour is your secret weapon. It has a lower protein content than all-purpose flour, which results in less gluten development, yielding a lighter, more delicate cake. If you don't have cake flour, you can make your own by measuring out 1 cup of all-purpose flour, removing two tablespoons, and then replacing those two tablespoons with cornstarch. Sift this mixture several times to ensure it’s well combined. This simple swap will make a noticeable difference in the texture of your white chocolate raspberry dream cake.
Step-by-Step Guide with Pro Tips
For the White Chocolate Cake Layers
Step 1: Preheat your oven to 350°F (175°C). Grease and flour three 8-inch round cake pans, or line them with parchment paper circles for easy removal.
Step 2: In a medium bowl, whisk together the cake flour, baking powder, and salt. Set aside. This ensures even distribution of leavening agents for your white chocolate raspberry dream cake recipe.
Step 3: In a separate bowl, melt the white chocolate chips or chopped white chocolate. You can do this in the microwave in 30-second intervals, stirring in between, or over a double boiler. Let it cool slightly.
Step 4: In a large bowl with an electric mixer, cream together the softened unsalted butter and granulated sugar until light and fluffy, about 3-5 minutes. This aeration is crucial for a light cake.
Step 5: Beat in the eggs one at a time, incorporating each fully before adding the next. Add the vanilla extract and mix until combined.
Step 6: Gradually add the cooled melted white chocolate to the butter mixture, mixing until just combined. Be careful not to overmix.
Step 7: Alternately add the dry ingredients and buttermilk to the wet ingredients, beginning and ending with the dry ingredients. Mix on low speed until just combined after each addition. Do not overmix – overmixing develops gluten, leading to a tough cake, which we want to avoid for this delicate white chocolate raspberry dream cake recipe.
Step 8: Divide the batter evenly among the prepared cake pans. Bake for 25-30 minutes, or until a wooden skewer inserted into the center comes out clean. The timing can vary, so keep an eye on them. This ensures moist layers for your white chocolate raspberry dream cake.
Step 9: Let the cake layers cool in the pans for 10-15 minutes before inverting them onto a wire rack to cool completely. Ensure they are fully cooled before frosting to prevent melting.
For the Raspberry Filling
Step 1: In a medium saucepan, combine the fresh or thawed raspberries, granulated sugar, and lemon juice. Cook over medium heat, stirring occasionally, until the raspberries break down and the mixture thickens slightly, about 5-7 minutes. The lemon juice brightens the raspberry flavor, making it pop against the white chocolate raspberry dream cake.
Step 2: In a small bowl, whisk together the cornstarch with 2 tablespoons of cold water to create a slurry. Stir the slurry into the raspberry mixture in the saucepan. Continue to cook, stirring constantly, for another 1-2 minutes, until the filling thickens significantly. This step is key for a stable filling for your white chocolate raspberry dream cake.
Step 3: Remove from heat and stir in the raspberry liqueur, if using. Transfer the raspberry filling to a bowl, cover, and refrigerate until completely cooled and firm, at least 1 hour. This ensures it won’t seep out of your cake layers.
For the White Chocolate Cream Cheese Frosting
Step 1: In a large bowl with an electric mixer, beat the softened cream cheese and unsalted butter until smooth and creamy, about 2-3 minutes. Make sure both are at room temperature for the best results in your white chocolate raspberry dream cake recipe.
Step 2: Melt the white chocolate and let it cool completely. Gradually add the cooled melted white chocolate to the cream cheese mixture, beating until well combined.
Step 3: Sift the powdered sugar into the mixture gradually, beating on low speed until fully incorporated. Add the vanilla extract. Increase the speed to medium-high and beat for another 2-3 minutes until the frosting is light, fluffy, and smooth. If the frosting is too thick, add a tablespoon of milk or cream at a time until desired consistency is reached. This frosting is the crowning glory of the white chocolate raspberry dream cake recipe.
Assembling the White Chocolate Raspberry Dream Cake
Step 1: Once all cake layers are completely cool, level them with a serrated knife if needed. Place one cake layer on your serving plate or cake stand.
Step 2: Spread about half of the raspberry filling evenly over the first cake layer, leaving a small border around the edge. You can create a 'dam' of frosting around the edge of the cake layer before adding the filling to contain it. This is a pro tip for a neat white chocolate raspberry dream cake.
Step 3: Place the second cake layer on top, gently pressing down. Spread the remaining raspberry filling over this layer.
Step 4: Top with the third cake layer. Apply a thin layer of cream cheese frosting all over the cake (top and sides) to create a crumb coat. This seals in any loose crumbs for a smooth finish on your white chocolate raspberry dream cake.
Step 5: Refrigerate the cake for 20-30 minutes to set the crumb coat. This step is crucial for a professional-looking cake.
Step 6: Once chilled, apply the remaining frosting to the top and sides of the cake, smoothing it out with an offset spatula or bench scraper. This is where your white chocolate raspberry dream cake really takes shape.
Step 7: Decorate the cake with fresh raspberries and white chocolate curls, if desired. You can make white chocolate curls by scraping a block of tempered white chocolate with a vegetable peeler or knife.
Step 8: Refrigerate the finished white chocolate raspberry dream cake for at least 30 minutes before slicing and serving. This allows the frosting to set and the flavors to meld beautifully. Store any leftovers in an airtight container. I love using my Basics Glass Food Storage containers for this, as they keep everything fresh and look great too.
Variations & Serving Suggestions
This white chocolate raspberry dream cake recipe is fantastic as is, but it's also incredibly versatile! Here are a few ideas to customize it:
- Berry Swap: Not a fan of raspberries? You can easily substitute them with fresh strawberries, blueberries, or a mixed berry medley for a different flavor profile. Each berry will bring its own unique tartness and sweetness to the white chocolate raspberry dream cake.
- Add a Nutty Crunch: Fold some finely chopped toasted almonds or pistachios into the cake batter or sprinkle them between the layers for an added textural element and flavor dimension.
- Lemon Zest Boost: For an even brighter, more zesty flavor, add 1-2 teaspoons of fresh lemon zest to the cake batter and/or the cream cheese frosting. It beautifully complements the raspberries in this white chocolate raspberry dream cake recipe.
- Boozy Kick: Instead of raspberry liqueur in the filling, consider a splash of Chambord (raspberry liqueur) or even a raspberry vodka for an adult twist. You could also brush the cooled cake layers with a simple syrup infused with a bit of liqueur before assembling.
- Serving Suggestions: Serve this decadent white chocolate raspberry dream cake chilled, accompanied by a cup of strong coffee or a glass of sparkling wine. A small dollop of whipped cream on the side is always a welcome addition, though certainly not necessary with such a rich frosting.
Nutrition Information
Here's a breakdown of the estimated nutrition information for a single serving of this delightful white chocolate raspberry dream cake recipe. Please remember these are estimates and can vary based on specific ingredients and portion sizes.
| Nutrient | Amount Per Serving |
|---|---|
| Calories | 620 kcal |
| Carbohydrates | 75 g |
| Cholesterol | 110 mg |
| Fat | 35 g |
| Fiber | 2 g |
| Protein | 6 g |
| Saturated Fat | 20 g |
| Serving Size | 1 slice (approx. 1/12th of cake) |
| Sodium | 280 mg |
| Sugar | 55 g |
| Trans Fat | 0.5 g |
| Unsaturated Fat | 10 g |
We believe that enjoying a slice of pure joy like this white chocolate raspberry dream cake recipe is part of a balanced and happy life. For another delightful dessert that’s bright and refreshing, be sure to check out our Ultimate Lemon Cloud Cake. And if you're looking for another fruity, layered masterpiece, our Raspberry Almond Cream Trifle is another must-try!
Conclusion
Baking, for me, is an act of love, and this white chocolate raspberry dream cake recipe truly embodies that sentiment. It’s a labor of love that results in a magnificent dessert capable of bringing smiles and creating lasting memories. From the first bite of the moist white chocolate cake to the burst of tart raspberries and the creamy embrace of the frosting, every element works in perfect harmony. I hope this white chocolate raspberry dream cake recipe becomes a cherished favorite in your home, just as it has in mine. Don’t hesitate to share your baking adventures and any personal touches you add to this incredible cake in the comments below. Happy baking!
FAQs
Can I use frozen raspberries for the white chocolate raspberry dream cake recipe?
Yes, you can use frozen raspberries for the raspberry filling. Just be sure to thaw them completely and drain any excess liquid before cooking them down. However, for garnishing, fresh raspberries are highly recommended for their vibrant color and firm texture.
How far in advance can I make this white chocolate raspberry dream cake?
The cake layers can be baked up to 2 days in advance, wrapped tightly in plastic, and stored at room temperature or frozen for up to 2 weeks. The raspberry filling can be made 2-3 days ahead and stored in the refrigerator. The assembled and frosted white chocolate raspberry dream cake is best enjoyed within 3-4 days when stored in the refrigerator.
What's the best way to store leftover white chocolate raspberry dream cake?
Leftover white chocolate raspberry dream cake should be stored in an airtight container in the refrigerator to keep it fresh and prevent it from drying out. The cream cheese frosting requires refrigeration. Bring slices to room temperature for about 15-20 minutes before serving for the best flavor and texture.
Can I make this white chocolate raspberry dream cake gluten-free?
While this specific recipe uses cake flour, you can experiment with a high-quality 1:1 gluten-free baking flour blend that contains xanthan gum. The texture might vary slightly, but many bakers have success with gluten-free alternatives for similar cake recipes. Ensure all other ingredients are also gluten-free if dietary restrictions are strict.
White Chocolate Raspberry Dream Cake
- Total Time: 2 hours 15 minutes
- Yield: 12 servings 1x
Description
A truly decadent and elegant layered cake featuring moist white chocolate cake, a vibrant raspberry filling, and a luscious white chocolate cream cheese frosting. Perfect for special occasions and guaranteed to impress!
Ingredients
2 ¾ cups cake flour, sifted
1 tablespoon baking powder
½ teaspoon salt
6 ounces good quality white chocolate, melted and cooled
1 cup (2 sticks) unsalted butter, softened
2 cups granulated sugar
4 large eggs, room temperature
2 teaspoons vanilla extract
1 cup buttermilk, room temperature
2 cups fresh or frozen raspberries
½ cup granulated sugar
1 tablespoon lemon juice
1 tablespoon cornstarch
2 tablespoons cold water
1 tablespoon raspberry liqueur (optional)
12 ounces (1 ½ packages) cream cheese, softened
1 cup (2 sticks) unsalted butter, softened
8 ounces good quality white chocolate, melted and cooled
6-8 cups powdered sugar, sifted
1 teaspoon vanilla extract
Fresh raspberries for garnish
White chocolate curls for garnish (optional)
Instructions
Step 1: Preheat your oven to 350°F (175°C). Grease and flour three 8-inch round cake pans, or line them with parchment paper circles.
Step 2: In a medium bowl, whisk together the cake flour, baking powder, and salt. Set aside.
Step 3: In a separate bowl, melt the 6 ounces of white chocolate (for the cake) using a microwave in 30-second intervals or a double boiler. Let it cool slightly.
Step 4: In a large bowl with an electric mixer, cream together the softened unsalted butter and 2 cups granulated sugar until light and fluffy, about 3-5 minutes.
Step 5: Beat in the eggs one at a time, incorporating each fully before adding the next. Add the vanilla extract and mix until combined.
Step 6: Gradually add the cooled melted white chocolate (from Step 3) to the butter mixture, mixing until just combined.
Step 7: Alternately add the dry ingredients and buttermilk to the wet ingredients, beginning and ending with the dry ingredients. Mix on low speed until just combined after each addition. Do not overmix.
Step 8: Divide the batter evenly among the prepared cake pans. Bake for 25-30 minutes, or until a wooden skewer inserted into the center comes out clean.
Step 9: Let the cake layers cool in the pans for 10-15 minutes before inverting them onto a wire rack to cool completely.
Step 10: For the Raspberry Filling: In a medium saucepan, combine the raspberries, ½ cup granulated sugar, and lemon juice. Cook over medium heat, stirring occasionally, until the raspberries break down and the mixture thickens slightly, about 5-7 minutes.
Step 11: In a small bowl, whisk together the cornstarch with 2 tablespoons of cold water to create a slurry. Stir the slurry into the raspberry mixture in the saucepan. Continue to cook, stirring constantly, for another 1-2 minutes, until the filling thickens significantly.
Step 12: Remove from heat and stir in the raspberry liqueur, if using. Transfer the raspberry filling to a bowl, cover, and refrigerate until completely cooled and firm, at least 1 hour.
Step 13: For the White Chocolate Cream Cheese Frosting: In a large bowl with an electric mixer, beat the softened cream cheese and 1 cup unsalted butter until smooth and creamy, about 2-3 minutes.
Step 14: Melt the 8 ounces of white chocolate (for the frosting) and let it cool completely. Gradually add the cooled melted white chocolate to the cream cheese mixture, beating until well combined.
Step 15: Sift the powdered sugar into the mixture gradually, beating on low speed until fully incorporated. Add 1 teaspoon vanilla extract. Increase the speed to medium-high and beat for another 2-3 minutes until the frosting is light, fluffy, and smooth. If too thick, add a tablespoon of milk or cream at a time.
Step 16: To assemble: Level cooled cake layers if needed. Place one cake layer on your serving plate. Spread about half of the raspberry filling evenly, leaving a small border.
Step 17: Place the second cake layer on top, gently pressing down. Spread the remaining raspberry filling over this layer.
Step 18: Top with the third cake layer. Apply a thin layer of cream cheese frosting all over the cake (crumb coat).
Step 19: Refrigerate the cake for 20-30 minutes to set the crumb coat.
Step 20: Once chilled, apply the remaining frosting to the top and sides of the cake, smoothing it out. Decorate with fresh raspberries and white chocolate curls. Refrigerate for at least 30 minutes before slicing and serving.
Notes
Ensure all dairy ingredients (butter, cream cheese, buttermilk) are at room temperature for the best results in cake batter and frosting consistency. For perfect white chocolate curls, use a block of tempered white chocolate and a vegetable peeler or large knife. Chill the cake layers before frosting for easier handling and a cleaner finish.
- Prep Time: 1 hour 15 minutes
- Cook Time: 30 minutes
- Category: Dessert
- Cuisine: American
Nutrition
- Serving Size: 1 slice (approx. 1/12th of cake)
- Calories: 620 kcal
- Sugar: 55 g
- Sodium: 280 mg
- Fat: 35 g
- Saturated Fat: 20 g
- Unsaturated Fat: 10 g
- Trans Fat: 0.5 g
- Carbohydrates: 75 g
- Fiber: 2 g
- Protein: 6 g
- Cholesterol: 110 mg
Leave a Reply